This week in Orchard - 10/26/2018
Interested in what will be the Orchard Core Cluster feature? Or the improvements of the Orchard Core APIs? If yes, you will love this post!
On Orchard Core
New Bootstrap checkboxes
Orchard Core will have a new Bootstrap checkboxes soon.
Orchard Core Cluster feature
Why don't we do a feature that will support clustering in a better way? Today what we have is a Redis Cluster. Redis Cluster works as a fail over/replica or a shard/partition. When you have multiple nodes of Redis you can define which nodes are slaves or masters, which are actually fail overs. But you can also define Redis nodes as partitions. The idea with the fail over is that all the data replicated on two different nodes, so if one node go down, the other one will take over.
The shard/partition strategy is to be able to scale out the memory, so if you have too much data to put once on a server then you create another one to share the data across the servers. Each node will be responsible for a partition of data. How it works is for each key that you store in Redis, the key will be hashed using the CRC(16) and it does a modulo of this hash 16384 and then you get a number which will be obviously between 0 and 16383.
Any key will be mapped to a number like this randomly because it's using a hash code. This key will be like the slot that you want to put your key on. Each node in a Redis cluster is responsible for n slots. When you configure your Redis cluster you say my Redis instance A will be responsible from the slots 0-4000. Than the node B will be responsible for the slots 4001-9000. So, you define n nodes, each node you need to configure which slot it should use and when a key sent to Redis, it will compute the slot that should go in based on a hash code. Then it knows that which instance has to handle this slot, so the key will be deterministically sent to a specific node. So, when you look for a key you know where to look for, because you know which slot it should be in, which Redis instance is to ask for. That's how Redis works.
Why not do the same thing for Orchard? Why not have Orchard to natively support the sharding/partitioning of nodes? Every Orchard instance could be configured to use the same Redis database with to able to send "Hi" message and everyone will get it using the message bus. When everyone gets the "Hi" message from a new instance joining the node then they can send the "Meet" message. Then everyone will know about every other instance on a cluster. By doing that we can decide (once a tenant is created or activated) which node will handle that using the same logic as the hash. They can communicate directly using REST APIs to say: "Please enable this tenant" and the other node will enable the tenant.
So, each node is an Orchard Core application with the Orchard Cluster module enabled. It works like the Tenants module and allows to communicate with other nodes. When a new node is created, it can join to a cluster by connecting to a common Redis database (no need for custom cluster name for simplification). When a node joins a cluster, it sends a "HI" message for all other nodes to be informed of the newly added node (including the address it can be contacted at). They then respond with a "MEET" message (including the address they can be contacted at).
About the Proxying:
- Each default tenant is able to forward the request to the correct node (relay mode).
- Generate a routing table each time a new tenant is added.
- Use a deterministic distribution.
- Use alphabetical distribution (from domain, or tenant name).
- Be able to configure the hashing logic on the proxy.
- Build a custom proxy module that is used as the reverse proxy.
- Should be able to download the routing file for any node, every minute.
- If the map is out of date, the relay will be used until the routing table is refreshed (HAProxy can do that https://www.haproxy.com/blog/web-application-name-to-backend-mapping-in-haproxy/)
- The default tenants need to be able to provide the routing table from an HTTP request.
- Custom modules can implement the routing table in custom formats (HAProxy).
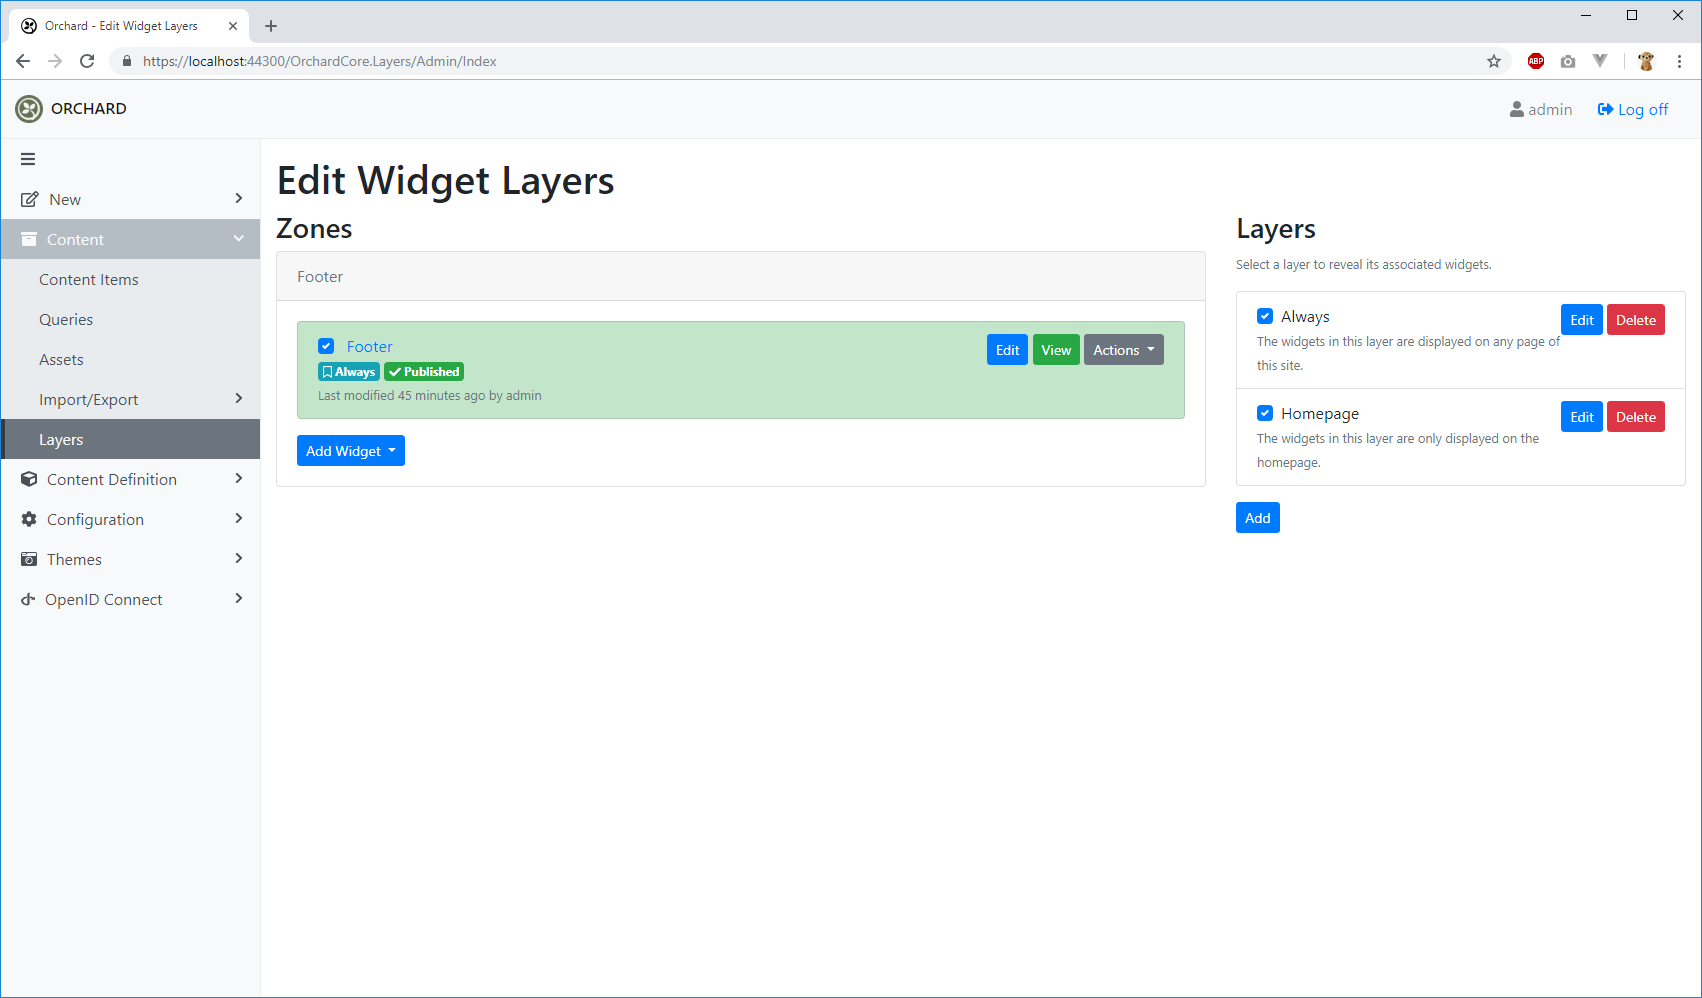
Test the new tenant APIs using GraphQL
The ShouldListAllBlogs() method in BlogPostTests.cs calles BlogContext.InitializeBlogAsync(). The BlogContext is inheriting from SiteContext and calling some GraphQL APIs to build something, like add a field to the blog.
In the SiteContext.cs you can find a line:
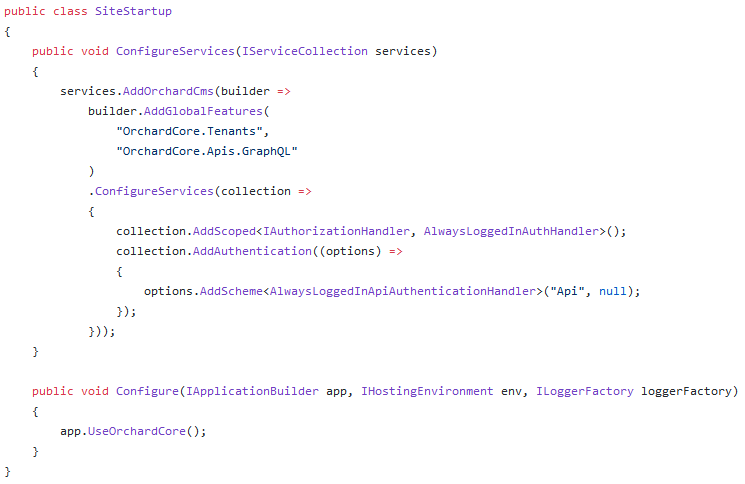
Site = new OrchardTestFixture<SiteStartup>();By doing that it's creating a new instance of Orchard running this SiteStartup. We have the OrchardCore.Cms.Web.csproj that contains one startup, that just says app.UseOrchardCore() and app.AddOrchardCore().
This Startup is a same thing, but instead of being a csproj, it's hosted dynamically by this code. The Unit Test will start the site represented by this startup.
This SiteStartup.cs says AddOrchardCms() and UseOrchardCore(), like in any other Orchard app. But this one will use the lambda that we provide to configure the Orchard Core instance and add custom features. This Orchard Core instance will enable the OrchardCore.Tenants and OrchardCore.Apis.GraphQL features, because the goal of this test is to check that GraphQL works. For that we need to get some APIs which are in the OrchardCore.Tenants feature.
Here we also registering a custom authorization handler, which will just say anyone who needs some permission, we will grant it. It's not testing the permission pipeline, just testing the GraphQL feature itself.
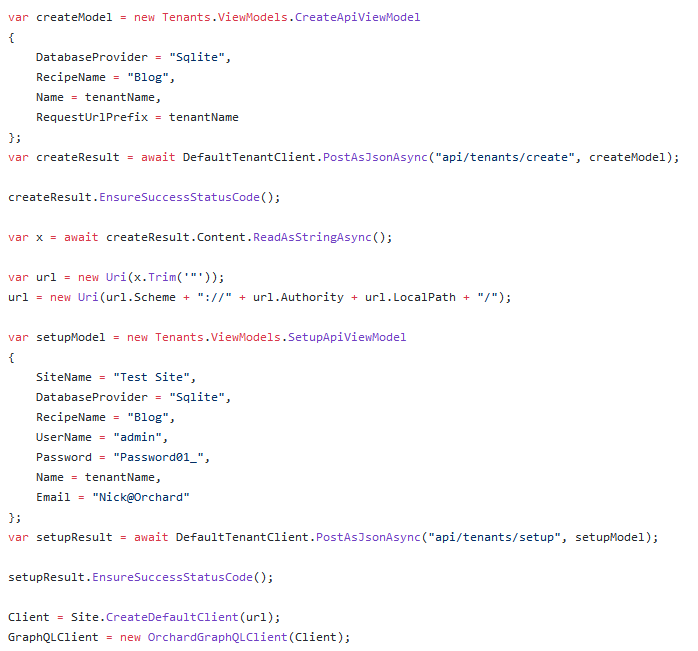
The Unit Test will launch the main Orchard app host and then create a tenant dynamically by calling into an HTTP REST API to create a tenant (api/tenants/create) and to set up a tenant (api/tenants/setup).
Demos
API endpoints to create/setup tenants and manipulate contents and using Orchard Core's authentication server
Set up a site with the Software as a Service recipe that allows you to setup your site with additional preconfigured options, features and settings out of the box.
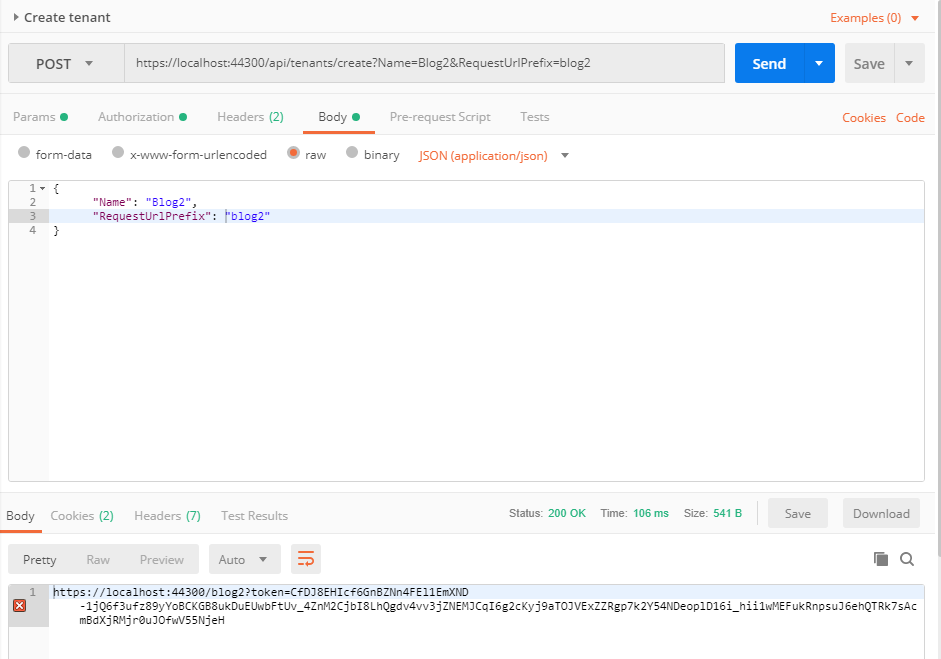
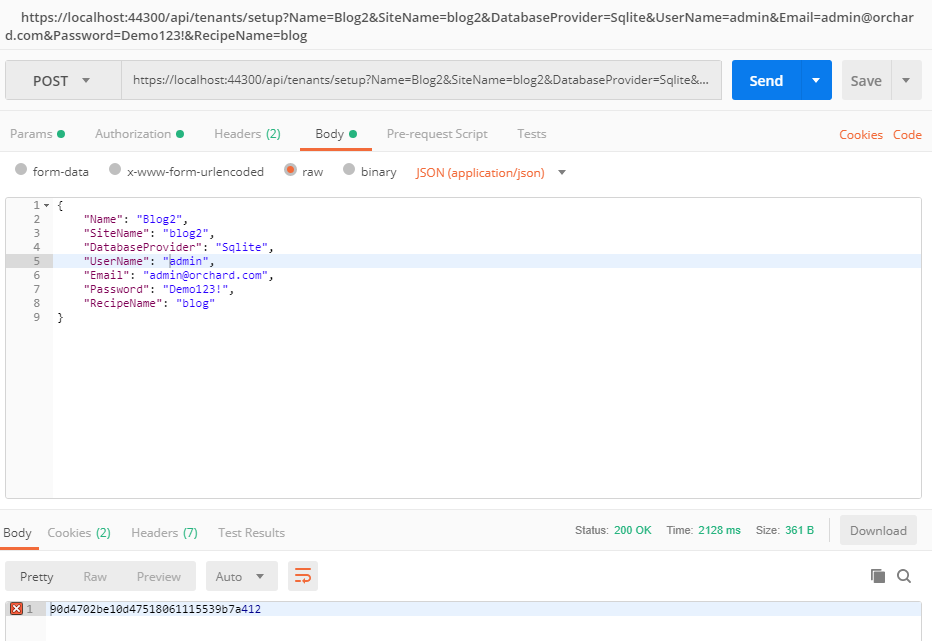
By making a POST request to the api/tenants/create endpoint you can create a tenant.
Let's see the following URL: https://localhost:44300/api/tenants/create?Name=Blog2&RequestUrlPrefix=blog2
Here you can pass the Name and the RequestUrlPrefix in the query string.
To setup a tenant you will need more parameters. The Name, the SiteName, the DatabaseProvider, the UserName, the Email, the Password and the RecipeName.
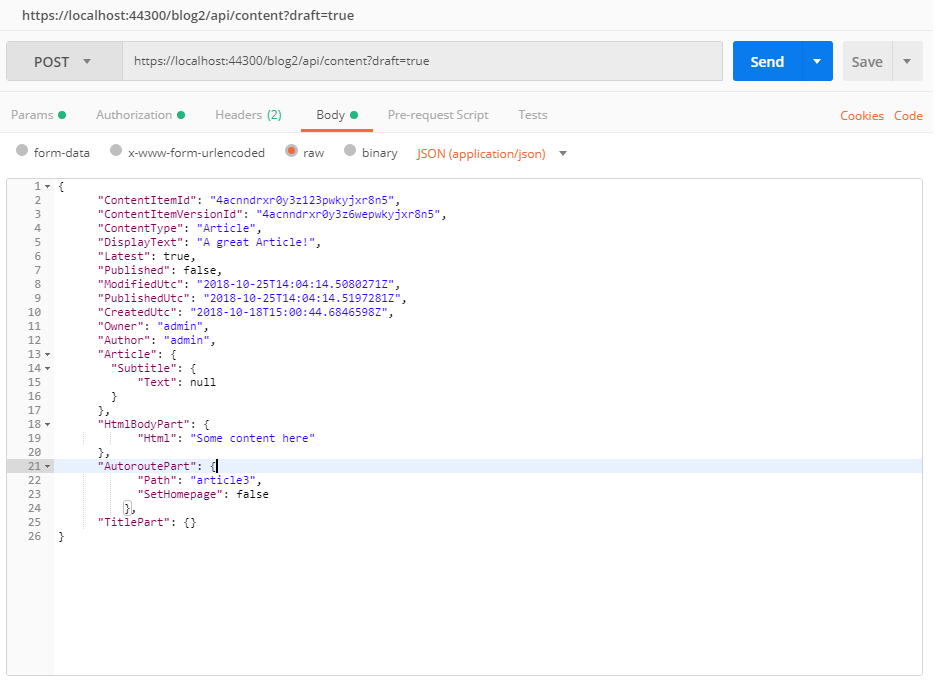
By using for example Postman you can create a tenant by making a POST request to a HTTP endpoint. You can also get, create or delete content. You can pass draft=true that creates or replaces an existing draft. Without passing the draft, it will create a published version of the content item.
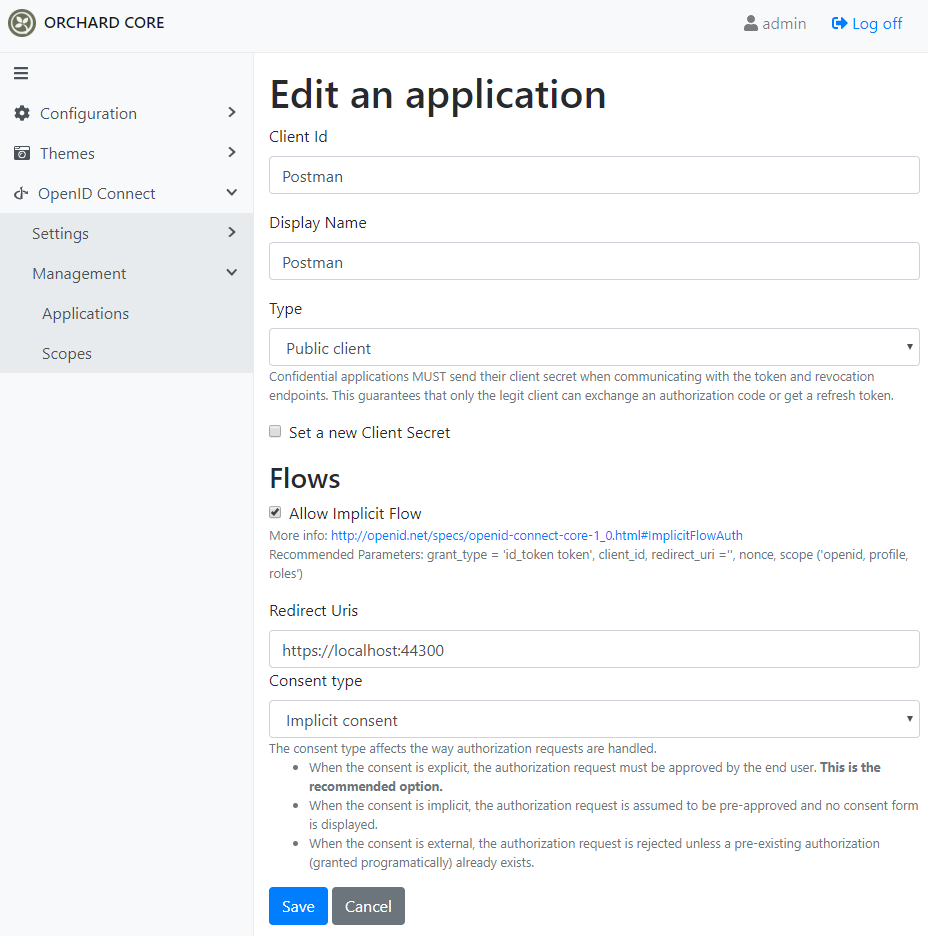
If we don't have the OpenID Token Validation and the OpenID Authorization Server features enabled we will not able to call APIs even the ones that allow anonymous users. After you need to set up the authorization server by navigating to OpenID Connect -> Settings -> Authorization server. Here you need to put a tick to the Enable Authorization Endpoint and Allow Implicit Flow checkboxes.

Don't forget to select an authorization server tenant under the Token validation menu.
Then under the Management -> Applications you need to add a new application. Let it be Postman with a public client type. We also need to tick the Allow Implicit Flow checkbox here and don't forget to set up Redirect Uris and the type of the consent.
After that you can get a new access token using Postman. Here we need an OAuth 2.0 typed token which we will send in the request header. When we get a new access token, we should provide the values of our Authorization server here.
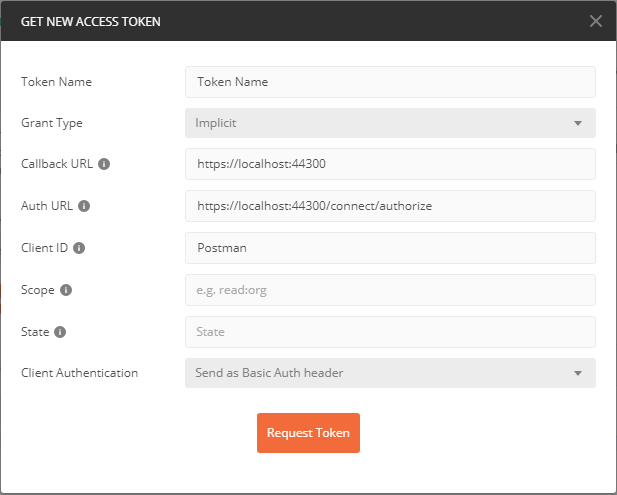
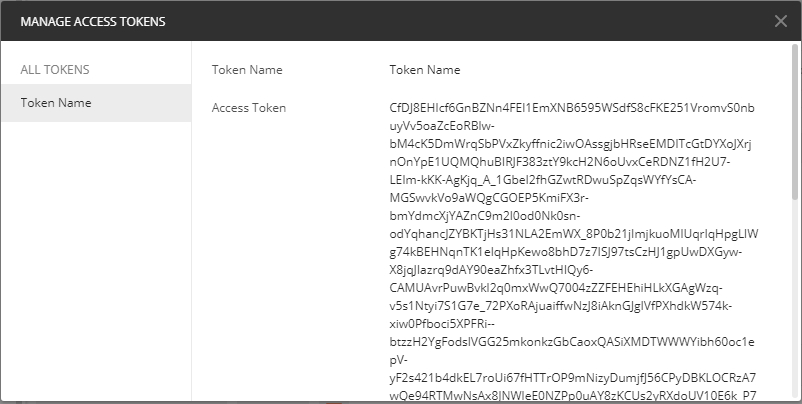
Now you will have an access token that you can use to validate yourself when using the APIs.
Display modes
The general idea is to add a Display Mode in fields settings and to be able to add settings on them that you can see in this issue. With the help of the Display Mode we can define which way we should render a content.
Let say we could have a display mode for text field like the field editor views. If we go to the content definition of a text field the new is the 'What type of display mode should be used?'. For example, if I want a header display mode, it asks the header type. Let's select one and check the display of this field on the front end.

It will allow a lot of new possible options:
For most display modes
- Liquid : Templates to display the field, may be allow to access to other field values.
- Summary/Details: Depend of the kind of shape.
- Zone/Position: Send the display to a specific zone and position.
- Text Field
- Truncate: Number of characters/words.
- Meta: Add it to the Head resources.
- Syntax Highlight: Select in which language.
- Translate
- Date, Time Fields
- Format
- Time ago
- Markup
- Timezone
- Numeric Field
- Money format
- Currency
- Boolean Field
- Labels depending on boolean value
- Media Field
- Carousel
- LightBox
We just scratched the surface of the topics that the community had this week. If you are interested in the whole conversation, don't forget to head to YouTube for the recording of the current podcast!